Tuesday, May 29, 2012

DIY Birthday Countdown!

This year my little Hailey is turning 3 i can't believe it!  I thought it would be fun to make her a birthday countdown, and she thought it was a good idea too! I had such a hard time coming up with an idea i liked. And honestly if your going the muffin tin route there is so many different ideas out there to decorate the squares. Let's just say i think this countdown is a tradition in the making!


 Since we left the mini muffin tin (in our mad rush out of Idaho)...in the storage unit i opted to use just a regular muffin tin and do the countdown go for 2 weeks before her birthday, i know your wondering there's only 12 spaces! Yes there is, so i bought her 2 smaller gifts that I'll wrap and let her open either 2 days before her birthday or 2 days before the countdown starts...anyways that doesn't matter....lol

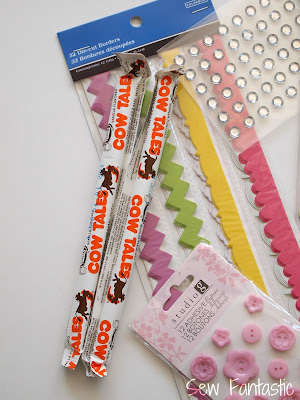
Super simple to make i just bought some birthday scrapbook embellishments - thank you Joann's for the 50% off sale you were having that day i decided to go and purchase this stuff....SCORE!

Ever try a cow tail? my friend Hannah introduced them to me maybe i was 12 or somewhere around that age? we'd always ride our bikes to Fabric land (aka Joann's before they changed the name) and we'd always buy them there because that seemed to be the only place that really sold them. Well ever since then I've been hooked!

Patiently waiting to help - Lovin those big blue eyes!

Next i cut out some white poster board (not pictured) 12 squares to fit right next to each other on the muffin tin, and then used some extra paint chips i had laying around to help decorate those plain white squares.

And this is what i came up with...yes kind of a sad sight...i am in NO WAY talented when it comes to scrap booking stuff and making things look pretty with paper and stickers!

Then the fun part! Finding stuff to put in the muffin tin, i just went to a party store - it was fun! 

Next i slapped some magnets on the backs of all those pretty squares so they'd stick to the muffin tin, after doing that i filled the muffin tin with the "surprises" and then placed the squares over it.

 I used a picture stand to set the whole thing on. 


 And there you got it! I seriously can't wait for her to start this countdown she is going to love it!
And like i said earlier there are so many options for decorating the squares, next year maybe it will be a Disney theme...you just never know!


Have Fun! 

Sunday, May 27, 2012

Zoo

On Saturday we decided to check out the zoo, we got there nice an early so it wasn't hot yet + we got a killer parking spot!  I wasn't to impressed by this zoo, but little miss Hailey liked it plus they had a merry go round and Hailey loves merry go rounds! Add on a playground right outside the zoo and it makes for a pretty full day!


Wednesday, May 23, 2012

Rainy Day Fun

Aug.6.2012
Hi Everyone!! 
I've gotten a few people telling me in the comments they can't find the rainbow printout i used for the pom-pom game.
First i want to say i'm so sorry that it has taken me so long to re-find it!
Here is the link specifically to the exact Rainbow i used:
http://engagingtoddleractivities.files.wordpress.com/2010/12/rainbow-pompom-template.pdf

If you want to check out somemore here is the link to the website where i found them,they are under the title "Fine Motor and Visual Perceptual Pages" 
http://www.superiortherapyconnections.com/worksheets-and-printable-resources.html

Have Fun!!


As most of you know we live in the state of RAIN.  We just had a couple weeks of pure sunshine and it was amazing! Living here really makes you appreciate and take advantage of those sunny days when they come around!
When it is raining it means a lot of indoor time, but it doesn't always have to be boring!  Recently i did this quick and easy little activity for Hailey to help keep her busy on one of those particularly long and rainy days. 
For me it was a win-win activity not only did she have fun But it also helped her improve her counting and color matching! YAY!


This by far has to be one of the easiest projects to make! 

There's not much to do to make this project. I printed out and laminated these pictures that i found online, Here is the link where i got the pictures (thank you Tasha!)
http://engagingtoddleractivities.wordpress.com/category/subject/math/counting/

Anyways i had some pom poms and magnets 

Glued a little piece of the magnet to the pom pom...this was kind of the tedious part...lol

Once i finished that i put the activity sheet on a cookie sheet

 The excitement is building...she can't wait!

Read, Set Go!  

 Magnets stick to the cookie sheet...i LOVE it!

She  loves it too!

One rainy day activity down....here's to hoping the sun wants to come back and visit us!


Have fun!


Tuesday, May 22, 2012

SOS

Hi!

I'm blogging over at Brassy Apple today for her SOS (Summer of Skills series) Come visit me over there if you get a chance!


Tuesday, May 15, 2012

The BEST Cajun Chicken

First i want to say welcome to all my new followers i'm so glad you here!
Also i wanted to say sorry if my blog seems a little slow or freezes up at some point, i'm not sure why it's doing that but please stick with me i'm working on trying to get it fixed! And if anyone has any suggestions or a solution as to why this could be happening (maybe it's happened to you before), i'd great appreciate some help!!

Moving on...........

Ready for an amazing recipe? This was my first time making Cajun chicken, it was very easy and SO delicious! A definite must keep, must make again very soon recipe!
So has anyone ever cooked with Cajun seasoning before?  I haven't but i knew instantly the minute i opened it and smelled how good it was ( the seasoning ) that this recipe was going to be keeper!! My mouth is watering just looking at these pictures!!


Anyways here's how to make it:

Ingredients:
1 1/2-2 lb Boneless Skinless Chicken breasts, cut into thin strips or chunks
4 ounces of linguine
2 teaspoons Cajun Seasoning (i used a little more than that)
2 Tbsp Butter
1/2 cup heavy whipping cream (or you can mix half whipping cream half milk)
2 Tbsp Chopped Sun dried tomatoes
1/4 tsp Salt
1/4 tsp Dried Basil
1/4 tsp Pepper
1/8 tsp Garlic Powder (or you can use fresh garlic)
1/4 cup Grated Parmesan Cheese


Place Chicken and Cajun seasoning in a bowl

Toss to coat

In a skillet saute chicken in the butter or margarine for about 5-7 minutes until it's tender

Once the chicken is cooked, reduce the heat and then you'll add your whipping cream,basil, salt, garlic powder,pepper

And don't forget the Sun Dried tomatoes

(Someone couldn't wait for dinner to be done....)


Heat all the way through - or for me it was until my pasta was done cooking, I'm not very good at timing things to be done at the same time.  


Then serve over linguine and sprinkle with Parmesan cheese.

Yum. Yum. Yum. 
I already can't wait to make it again!

Wednesday, May 9, 2012

Lace Pillowcase Dress

I've never made a pillowcase dress before but i knew when i made one i wanted to make it a little different than the "traditional" pillowcase dress,and here is what i came up with. I was a little skeptical...but in the end i Love how it turned out!
I'm going to keep this post pretty simple just because i'm sure most or maybe all of you have made a pillowcase dress before.


I used some regular pink cotton fabric and some lace material and ribbon for the ties.


I cut the fabric approximately 22inches long by 20inches wide, since it ended up being a bit long i just hemmed the  pink fabric as needed.

Then i sewed just across the top, of the lace and the pink fabric to attach them together

Fold the whole thing in half right sides together and sew down the side.

Next i cut the armholes to the size i wanted and sewed bias tape onto the raw edges of  it.

And then folded down the top a 1/4: and then again about a 1/2" and sewed across (you can see the pins) this made the casing for the ribbon ties. I did this on both sides.


Then i threaded my ribbon pieces through with a safety pin and there we have a pillowcase dress!

But it doesn't stop there!
Next i made a simple belt using some elastic, sew on snaps and i also made a fabric flower to cover the snap.

And there you have it. I guess it could technically be 2 dresses a Pillowcase dress and then if you want it a little dressier you can add the belt.

Perfect.

Ribbon ties 


Smile and say CHEESE!....lol

Peeking through the mailbox.

So have you ever made a pillowcase dress before? If not maybe try giving it a different look!

Have Fun!
Related Posts Plugin for WordPress, Blogger...