So a couple weeks ago i went to my first tree festival and it was pretty awesome! There was one tree in particular that i loved the most and it had a vintage theme...i don't know why but lately i just love the vintage look! As i was looking at the tree for the second time i noticed these amazing ornaments and knew that i could remake them! Aren't they pretty cool?
So here is my version of the ornament, I've tried this ornament 2 times and failed, i guess that the 3rd times the charm ;)
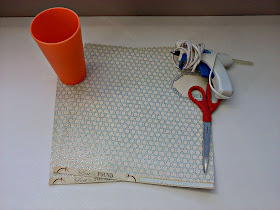
Here's What you'll need:
Scrape book paper
Scissors
Glue
Something to make circles with - I used the bottom of a cup
Ribbon or thread
First cut out some circles....about a million..well maybe not that many...
(sorry about the purple-ish color of some of these photos im not sure why they turned out that way)
Also cut out one the same size out of paper and draw a triangle on it.
Fold up the sides of the circle on the lines you just made for the triangle as pictured
This is going to be what you'll use to fold up the edges of all the circles.
So after you do that to the circles...i just did about 20 to start with...you shouldn't need much more than that.
Next go ahead and glue 2 sides together
And continue to keep gluing here is mine a little over halfway through
Glue and glue and glue till you get to the point where you just have one more left to place, this is when you'll glue a piece of ribbon or thread on the inside flap for hanging it.
Go ahead and glue the last piece and wa-la! so pretty! I love using paper that has glitter or sparkles it just looks so much nicer, plus you don't have to decorate it!
Have Fun!


This ornament tutorial is SEW cute! I am your newest follower! I think your blog is adorable. I would appreciate it if you came and checked out my blog and followed me back! Thanks!
ReplyDeletehttp://milliemorganmedia.blogspot.com
Your ornaments turned out beautifully. Love the paper and pattern you chose. So glad we were "neighbors" at The Southern Institute's linky party. Cheers! Jenn/Rook No. 17
ReplyDeleteThis ornament came out great. I made a similar one with cards we got at our wedding. Nice job!
ReplyDeleteKarah @ thespacebetweenblog
Great, thank you for this nice tutorial!
ReplyDeleteI am loving these geometric ornaments this year, thanks for sharing the tutorial! Great choice of papers :D
ReplyDeleteGreat tutorial. Love the colours. Thanks so much for sharing. Hugs Mrs A.
ReplyDeleteOh, how cool! I thought this was goingto be super tricky, but i think I can handle it. You might be able to do this with kids who are a little older too. Awesome idea.
ReplyDeleteShiloh
everydaygameplan.net
cute! i have that paper too, it's so pretty but leaves glitter everywhere!!!
ReplyDeleteHow pretty! I love it.
ReplyDeleteRachel
adventuresofadiymom.blogspot.com
such a pretty, kinda old-fashioned, vintage look. Good job, thanks for explaining. I'm having a link party on my blog and I'd be tickled pink if you'd link this up! http://caribbeanmissionarywife.blogspot.com/2011/12/t-time-48-and-link-party.html
ReplyDeleteSo pretty. I can't belive you cut them all out by hand. You've got patience! Thanks for linking up at Etcetorize~
ReplyDeleteLove the beauty and simplicity! I'm a new follower too. Stop by and enter to win my Heirloom ornament...only 1 day left to enter. Warm wishes
ReplyDeleteThis is a wonderful idea! Thanks for sharing.
ReplyDelete~Mrs. Delightful
ourdelightfulhome.blogspot.com
I tried these before too and completely failed. Maybe I'll try again.
ReplyDeleteThese are so pretty! Love the paper you used!
ReplyDeletethis is beautiful I'd love it if you would add them to my What We Wore and Made link party over at http://raegunwear.blogspot.com/search/label/WWWMW
ReplyDeleteBeautiful! I have made them for years, even out of fabric (fused to cardstock). Old Christmas cards are fun, too. There is an easier way to put them together - I'll try to do a tut & share with you.
ReplyDeleteReally cute & good tutorial. Would love for you to link it to my Craftastic party:) Stopping by from Happy-Go-Lucky's Mingle With Us.
ReplyDeleteWhoa! That's really great! Thanks for stopping by my blog and following. Following you back!
ReplyDelete-Mackenzie @ www.fridaynightdatenight.blogspot.com
Such a great vintage inspired idea with gorgeous results. Now you will have heirloom ornaments that will remind you of 2011 when you pull them out in future years. So happy you linked this up to Motivated Monday at BeColorful
ReplyDeletePam
very cute and great tut.
ReplyDeleteI'd love it if you could link this project to my Christmas Inspiration party at ~ http://shabbyartboutique.blogspot.com/2011/12/inspiration-friday_16.html
The craft paper you used is so pretty! Would love love love for you to share this at our party going on now http://space46.blogspot.com/2011/12/co-hosting-pinteresting-link-party-week.html. Happy holiday! My
ReplyDeleteThis is so clever, ideas are running through my head. I am so glad I found your special place here. Thanks for sharing. I will follow on my way out so as I would love to visit again. I hope you will find the time to come visit my place and do the same. Wishing you a very Merry Christmas and I look forward to engaging and supporting your blog in the New Year. Cheers SpecialK XoXo
ReplyDeleteThis is featured on my linky list today! Thanks for linking up!
ReplyDeletehttp://aworldofcrafts.blogspot.com/