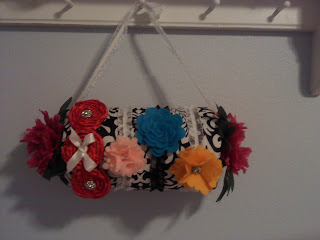
So here it is the long awaited NO SEW headband holder!!
I love it!!
Here's what you'll Need:
- Oatmeal container (or i've also used a brand new paper towel roll )
- Fabric
- High or low loft batting
- Magnets
- Ribbon
- Fake flowers
- Glue gun
First take you batting and cut out a piece long enough to go around the oatmeal container
Start Gluing!
Once you finish it should look about like this
Next cut your fabric, i cut mine 15 inches wide by 20 inches long (i probably could of cut it a little shorter but it still worked just fine)
Next- i will admit i was feeling a little lazy and instead of going All the way downstairs to sew up the raw edges(on one of the short ends) I just HOT GLUED it, fold over and glue and then fold it over once more and glue - it worked amazing! yay for glue guns :)
Next start gluing your fabric in place starting with the side that has the raw edge (not the one you just glue hemmed) Also make sure there is an even amount of fabric on each of the ends.
Here's what it will be looking like.... with your nicely glued seam on the back
Next you will glue the ends down.
Lookin good!
This is totally optional but i put a ribbon on it for hair clips gluing just the ends to the backside.
Next i decided how long i wanted the ribbon that would hold it up (i just eyeballed it) and then glue one end of the ribbon to one side.
Next glue your flower (or other decoration on the end over the ribbon you just glued on.
Moving to the other end- glue on one of your magnets
Then grab another flower and glue the other end of the ribbon on top of the flower
And then glue another magnet on top of the ribbon
This will make one end removable to slide headbands on and off.
Then make it pretty with headbands and clips! I think i might need to make a longer one ;) or just stop making headbands....lol
So easy....made in under an hour!
Mine will make it's home in the bathroom on the towel ring that's just waiting to be used, where will yours go?


Great idea!
ReplyDelete~Mrs. Delightful
ourdelightfulhome.blogpsot.com
Cute! I need a great way to hold all of my daughter's headbands! Thanks for sharing this at my What's In The Gunny Sack? link party!
ReplyDeleteVery cute idea! Doesn't it feel great to recycle stuff too? Awesome!
ReplyDeletewww.karismaheartsavannah.blogspot.com
Awesome, awesome idea! Thanks for linking to Things I've Done Thursday!
ReplyDeleteMelanie
bearrabbitbear.blogspot.com
I really need one of these. Thanks for the idea!
ReplyDeleteSo cute!! Love how that turned out!
ReplyDeleteThanks for linking up to Show & Share!
What a darling way to store all of those headbands! Guess what? Your link was selected to be my blog of the week for next week if you are interested, I would love to have you! Comment on the featured post, or email me, and I will give you the info!
ReplyDeleteCarlee
http://www.ladybirdln.com/2011/10/weekend-show-off-features-1017.html
I have been wondering how to store those headbands, and now I know! Thank you!!
ReplyDeleteI found your link at Someday Crafts. You have great posts, so I became your follower!
OMG you don't know how much I love this! I don't have any children and I don't wear headbands but I can think of many other uses for it. And the fact that it's a 'no-sew' really draws me in cause I can't sew to save my life. lol Thanks for this one! :)
ReplyDeleteThis is a great project. Looks so pricey, but so cheap to make. If I knew anyone that wored headbands, I would totally make one of these as a holiday gift. I love crafting.
ReplyDeleteHopped over from Strawberry Jam today. Hope to see you visit my blog.
-Nora
http://norabpeevy.blogspot.com/
Brilliant. My little girl isn't quite into real headbands yet, but seeing as I'm a hot mess when it comes to storing her baby ones (read: all over my house in every nook and cranny) then I can safely assume we will be needing something like this when she gets to that stage. I was sure to pin it.
ReplyDeleteI'm in love with this idea!
ReplyDeleteOne word: GENIOUS! I have been thinking of ways to spruce up my old can headband holder. I just wrapped pretty paper around it, but is still wasn't what I wanted. THIS IS IT! PERFECT!!! I LOVE LOVE LOVE it!!!!!!
ReplyDeleteThanks for linking up at my linky party!
http://aworldofcrafts.blogspot.com/
What a great idea :)!
ReplyDeleteLove for you to link up at:
"Made by ME" Linky Party at JAQS at http://www.jaqsstudio.com/2011/11/made-by-me-5-linky-party-and-features.html
beautiful and so use full
ReplyDeleteSuch a great idea!! Gonna have to try this one.
ReplyDeleteMelissa
redflycreations.blogspot.com
Great idea!
ReplyDeleteGreat idea. I think I'll make that this weekend. I have headbands all over the house.
ReplyDeleteI made it!! It's not as perfect as yours is, but I did it. Her new room will be TInkerbell Fairies and I used that fabric. I'll post it on my blog in a bit. IF you have some time, check it out. I will totally give you all the credit.
ReplyDeleteDorcas
www.craftycardangel.com
This is so neat! My daughter has tons of headbands and could definitely use somewhere to put them...besides her drawers. Plus, this is so cute!
ReplyDeleteSharon
http://makeitorfixit.com