Sunday, November 20, 2011

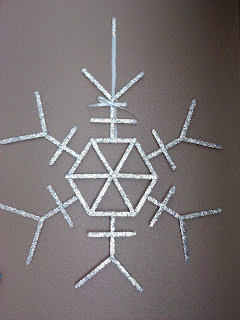
Popsicle Stick Snowflakes

Have you entered my giveaway HERE? it only takes a minute!

When i first got started with Pinterest these popsicle stick snowflakes really caught my eye and was one of the first projects i pinned. I haven't been able to get it out of my head since! 


So i finally got this project out of my system yesterday. And i LOVE how they turned out! The tutorial for these was very easy to follow.


They were super simple,quick to make and i won't lie i had lots fun making them! 


This one i painted with glue and sprinkled with glitter - LOVE it!


 My husband was actually impressed with this project! This one's going in the front window for sure!

Friday, November 18, 2011

Obol Review and GIVEAWAY!


~GIVEAWAY CLOSED ~


Have you ever heard of an Obol?


I never had but recently discovered Obol and was so amazed why didn’t I know about this amazing bowl sooner!! I contacted Obol and they said they would send me one to review and also would do a giveaway! I seriously waited and waited to get the obol I was so excited for it to come! When it did come as silly as it sounds it was like “Christmas day” I was so excited!  This is the PERFECT solution for my husband and daughter who won’t eat cereal because it gets soggy - well Problem solved! Whoever came up with this bowl…..in my mind is a pure genius!


The slanting of the bowl gives it space under the upper section which makes it not only tall but also wide, the bottom of the bowl is designed so that you can hold it with a firm grip while you eat (if you’re not around a table)…this was one of my FAVORITE features..I couldn’t’ t seem to stop holding it from the bottom…I really love this function! It’s perfect for if you want to sit on the couch and watch TV while you’re eating or for me during the summer when I like to eat outside.


The absolute best part of the bowl is that it gives you the ability to walk away from it and then come back to cereal that is not soggy……I’ve had a lot of times where I’m eating breakfast and  all of a sudden my daughter needs me and I have to stop in the middle of eating, or I’ll have somebody call me and I’ll be on the phone for 15 minutes …I love that when I come back my cereal is separated from my milk, there is no more wasting cereal in my house!


This bowl not only can be used for cereal but you can use it for so many other foods, such as soup and crackers, chips and dip yogurt and fruit or even milk and cookies! The price is definitely not bad for what you’re getting; this bowl is larger than a normal sized bowl which I love!


Brookstone.  sells this bowl in some amazing bright colors – red,orange,green,blue and then the standard white.


Overall I loved this bowl for so many reason but here's a few to sum things up!

1) It has such a handy underside for holding the bowl while your sitting
2) Allows you to get distracted while your eating
3)Also lets you eat cereal in a timely manner without without it getting soggy
4) Comes in different colors at Brookstone
5) And it can be used for more than just cereal!


So Obol is giving away one of there amazing bowls to one luckey Sew Fantastic reader! 

Mandatory Entry!

Like Obol on Facebook HERE and then leave me a comment telling me you did so, with your name and e-mail.   

For Extra Entries

1)Follow Sew Fantastic on the right sidebar - and leave a comment letting me know, along with your name and e-mail.


Giveaway Ends:   December.5.2011

Don't for get to check out Obol's website Here!


Tuesday, November 15, 2011

3D Heart Art!

Have you entered the Obol giveaway? You can do it HERE!


Hi! I hope everyone had a fun weekend, we kept busy even though it was cold and snowy for part of the  time, which equaled drinking lots of hot chocolate! I feel like this month has flown by is thanksgiving really next week?! I’m not ready!!
So I’ve been wanting to do this project for awhile because I absolutely love 3D art! So I was so excited to start and actually finish this project in one day!!  

So here is my version of 3D heat art!


Supplies You Will Need

Frames - I just bought mine from the dollar store
Fabric - I used 8 different colors of fabric, but you could do this with just  4 colors or even 1 depending on how many you want to make.
Glue any kind OR you can use modge podge
Hot glue gun
Scissors
Sewing machine
Flat push pins(optional if your frame already has a way to be hanged)
Paper


I bought these frames earlier this summer and spray painted them white.


Pick out 8 different fabrics or you can just do 4 if you want the hearts to be just one color.


Next cut out 3 hearts  one big, one medium size and one small


Next  I cut out a big square and a small square to fit the big and small hearts on  out of my main fabric (the polka dot) I did this for each color


Then I cut one medium square out of each of my solid colors using the medium heart shape I cut earlier


Then go ahead using your glue (or modge podge) paint the right side of all your fabric squares.


Let it dry, it may start to curl so I just put them between some books


I also cut out a piece of cardboard to fit on the back of the frame as the background  and then I hot glued fabric to it – it’s ok if the back isn’t pretty nobody’s going to see it!


Then place the cardboard on the back of the frame.


I also had some flat push pins and glued one on the back of each frame as well because there wasn’t anything to hang it with.  (but this is optional if your frame has something to hang it on the wall)


Once the fabric was dry I cut out my large and small hearts on the polka dot fabric and then my medium hearts on the solid fabric


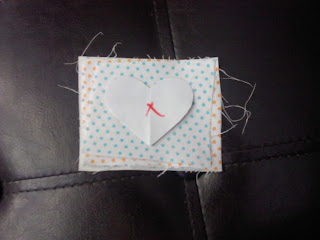
Go ahead and fold all you hearts in half and then place the  medium heart on top of the large heart matching up the perforated lines SEW straight down that line.

then place your smallest heart on top lining up the middle lines.I then repeated this for the other colored hearts.


Then go ahead and turn your heart over using your hot glue gun glue just down the middle and then place onto the middle of your frame.


And then i just repeated the sewing and gluing for the other 3


Blank Wall


Pretty Wall!


I love how they turned out, the hearts are just popping out of the frame! 

Sunday, November 13, 2011

Tell Me About Yourself Award!

Its been a cold weekendwe got a few inchecs of snow and little miss hailey loved it! She even helped daddy shovel the walk!


I received the Tell me About Youself award from Mikki at Moms Best Nest Its sure has been fun to receive  awards and pass them on! If you havent checked out  moms best nest. Be sure you do she has some really great posts! I especially loved her tutorial for a schoolwork gallery definitely something I want to try! Thanks again Mikki for passing on this award to me!


Now the rules for this award are:

1.I must tell 7 things about myself
2. pass this on to 15 other bloggers

So here goes 7 things about me

1.      I love sewing cute girly things for my daughter
2.      I’m not a big fan of snow…especially when it sticks around for 7 months (I really miss my southern California winters)
3.      I have a big phobia of spiders –which unfortunately I think I’ve passed onto my daughter
4.      I love to play the piano and hope to teach my Hailey to play someday. 
5.      Driving on snow and ice is NOT my favorite thing to do in the winter.
6.      I Love breakfast food and could eat it every meal of the day
7.      I love to go running, even if I can’t run more than 2 miles at a time…it’s a work in progress ;)

Step 2
Here are the lucky 15 bloggers!

3.       http://www.lateyoungfamily.blogspot.com/
9.       http://creativecarmelina.blogspot.com/

Have a great rest of your weekend....what's left of it!

Thursday, November 10, 2011

Best Play Dough Ever!

Have you entered the Obol giveaway? you can do it HERE


We’ve had a shortage of play dough in our house lately-which Is a bad thing according to a 2 year old! It’s one of her favorite things to do….. and one thing I know is that I’m so  tired of buying play dough! So today when Hailey asked me for the hundredth time to play with play dough…and we had none…I thought now was the perfect time to make some! 
These instructions are for THE BEST play dough ever!! I love how smooth it feels and I don’t think I’ll ever buy play dough EVER again! It’s also really quick to make so I made a few different colors.


Here’s what you’ll need:

1 cup water
1 cup flour
1/4 cup salt
1 tbsp vegetable oil
2 tsp. cream of tarter
Food coloring (I usually put 4-6 drops depending how dark I wanted the color


Combine all the ingredients together in a  pot.


Turn the stove on to medium heat and continuously stir until everything sticks together into one ball


Then place onto wax paper or you can just use your counter top


Let it cool a couple minutes and then knead it until smooth.


Then if you want more repeat…I ended up making 4 colors and then I got tired of making it. Another idea is you could put glitter in it to give it a little sparkle, if i had glitter at the time i would definitely have  done that!


Keep it in a sealed container (I just used sandwich Ziploc bags)  and if it becomes a little dry after time put it in a bowl and knead a little water into it.


Then let the kiddo or kiddos have fun!


So much fun!


 The cookie cutters were her favorite thing to use.

I eventually got out the 'rockin roll' aka the rolling pin for her to use as well and she loved that!

Have fun making play dough for your kids!
Related Posts Plugin for WordPress, Blogger...